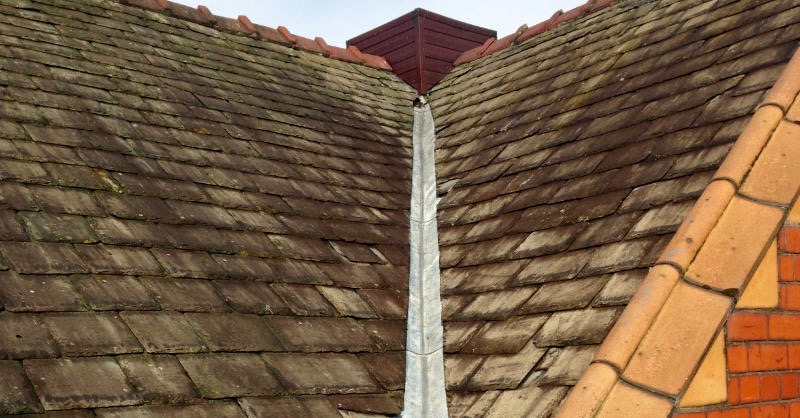
Like any other trade or profession roofers use names and terminology that can mean nothing to the average householder. We have decided to put together some short articles that will clearly explain what areas and parts of your roof these names refer to.
[fusion_builder_container hundred_percent=”yes” overflow=”visible”][fusion_builder_row][fusion_builder_column type=”1_1″ background_position=”left top” background_color=”” border_size=”” border_color=”” border_style=”solid” spacing=”yes” background_image=”” background_repeat=”no-repeat” padding=”” margin_top=”0px” margin_bottom=”0px” class=”” id=”” animation_type=”” animation_speed=”0.3″ animation_direction=”left” hide_on_mobile=”no” center_content=”no” min_height=”none”]
In this first article we will look at the roof valley, where it is situated and the role it performs on a roof. The point / joint at which two different roof aspects meet forms a drainage channel which is referred to as the valley. It will usually be lined with lead and can be considered one of the most vulnerable areas, as it’s constantly tasked with carrying away heavy rainfall. Like all ferrous metals lead expands and contracts when subjected to different temperatures and over time this can cause splits or tears to occur. The valley can also be subject to damage from slipped tiles or slates falling into it and puncturing the lead.
[/fusion_builder_column][fusion_builder_column type=”1_1″ background_position=”left top” background_color=”” border_size=”” border_color=”” border_style=”solid” spacing=”yes” background_image=”” background_repeat=”no-repeat” padding=”” margin_top=”0px” margin_bottom=”0px” class=”” id=”” animation_type=”” animation_speed=”0.3″ animation_direction=”left” hide_on_mobile=”no” center_content=”no” min_height=”none”]
When a valley is damaged it will quickly allow rainwater to penetrate into the building and prompt remedial action needs to be taken to prevent internal damage. A temporary emergency repair should first be carried out, applying flashing tape over the split and covering this with an elastomeric paint such as Cromapol. A well applied ‘patch’ should last for a number of months but the only permanent solution is to re-line the valley in lead.
[/fusion_builder_column][fusion_builder_column type=”1_1″ background_position=”left top” background_color=”” border_size=”” border_color=”” border_style=”solid” spacing=”yes” background_image=”” background_repeat=”no-repeat” padding=”” margin_top=”0px” margin_bottom=”0px” class=”” id=”” animation_type=”” animation_speed=”0.3″ animation_direction=”left” hide_on_mobile=”no” center_content=”no” min_height=”none”]
[/fusion_builder_column][fusion_builder_column type=”1_1″ background_position=”left top” background_color=”” border_size=”” border_color=”” border_style=”solid” spacing=”yes” background_image=”” background_repeat=”no-repeat” padding=”” margin_top=”0px” margin_bottom=”0px” class=”” id=”” animation_type=”” animation_speed=”0.3″ animation_direction=”left” hide_on_mobile=”no” center_content=”no” min_height=”none”]
The replacement process starts with careful and ordered removal of the valley tiles to expose the timber valley board on which the lead lies. The valley tiles can be put to one side for replacing when the new lead has been installed. The valley must then be thoroughly checked and cleared of any tile fragments or nails that may be present, as these will puncture the new lead when it is fitted.
Time to go roof geek now guys. The fitting of the lead into a valley is referred to as ‘dressing’ and I’m told the term is derived from the process of dressing an animal hide, where the hide is beaten. Store that one for when you’re on The Chase lol !
Anyway back to work. At the same width as the valley board, the first section of lead is dressed in using specialist timber dressing tools
[/fusion_builder_column][fusion_builder_column type=”1_1″ background_position=”left top” background_color=”” border_size=”” border_color=”” border_style=”solid” spacing=”yes” background_image=”” background_repeat=”no-repeat” padding=”” margin_top=”0px” margin_bottom=”0px” class=”” id=”” animation_type=”” animation_speed=”0.3″ animation_direction=”left” hide_on_mobile=”no” center_content=”no” min_height=”none”]
to form the lead sheet to the shape of the valley. When this has been done the lead can be nailed but only on one side, to allow the lead to expand and contract. Nailing both sides will prevent this and cause the lead to split.
[/fusion_builder_column][fusion_builder_column type=”1_1″ background_position=”left top” background_color=”” border_size=”” border_color=”” border_style=”solid” spacing=”yes” background_image=”” background_repeat=”no-repeat” padding=”” margin_top=”0px” margin_bottom=”0px” class=”” id=”” animation_type=”” animation_speed=”0.3″ animation_direction=”left” hide_on_mobile=”no” center_content=”no” min_height=”none”]
We continue dressing in and nailing the sheets up the valley until the end point is reached, an average length valley will usually be three sheets. [/fusion_builder_column][fusion_builder_column type=”1_1″ background_position=”left top” background_color=”” border_size=”” border_color=”” border_style=”solid” spacing=”yes” background_image=”” background_repeat=”no-repeat” padding=”” margin_top=”0px” margin_bottom=”0px” class=”” id=”” animation_type=”” animation_speed=”0.3″ animation_direction=”left” hide_on_mobile=”no” center_content=”no” min_height=”none”][ end pic ] Here we have been able to dress the final piece under the overlapping lead from the opposing valley to form a watertight seal. The valley tiles can now be re-fixed to complete the job, replacing any breakages where necessary.
Hope you’ve found this article interesting and informative and if in the future a roofer tells you your valley needs dressing you might not be so inclined to think he’s being fresh with you ![/fusion_builder_column][/fusion_builder_row][/fusion_builder_container]
February 02nd, 2016
Category: Roof Terminology